
 한국어
한국어BLOG
Ubuntu 11.04 Natty on ODROID-A
We posted Ubuntu 10.10 installation guide couple of weeks ago.
We have tried Ubuntu 11.04.
I followed below steps to install the Ubuntu 11.04 on ODROID-A.
0. You may need below items to install Ubuntu.
– Odroid-A
– Micro-SD USB card reader
– USB Serial port with debug board for low level debugging.
– USB hub with external power supply
– USB-to-Ethernet (with AX8817X chipset)
– USB keyboard
– USB mouse
1. Install rootstock on your host Linux (Must be upgraded to 11.04 first)
2. Make a minimal root file system of Ubuntu with below command.
$sudo rootstock --fqdn odroid --imagesize 4G --dist natty --serial ttyO2 --login odroid --password odroid --seed wget,nano,linux-firmware,wireless-tools,usbutils,btrfs-tools,i2c-tools,wpasupplicant \"main universe multiverse\" --kernel-image http://rcn-ee.net/deb/natty/v2.6.38.4-x3/linux-image-2.6.38.4-x3_1.0natty_armel.deb
After rootstock process, you will have a compressed tar ball which contains Ubuntu 11.04 root file system.
Note, the ID is ‘odroid’ and passwd is ‘odroid’
3. Make partition and format the Micro-SD as below.
Disk /dev/sdc: 8270 MB, 8270118912 bytes

255 heads, 62 sectors/track, 1021 cylinders

Units = cylinders of 15810 * 512 = 8094720 bytes

Sector size (logical/physical): 512 bytes / 512 bytes

I/O size (minimum/optimal): 512 bytes / 512 bytes

Disk identifier: 0x00000000

Device Boot    Start    End    Blocks   Id     System

/dev/sdc1        800      1021   1754910   b     W95 FAT32

/dev/sdc2        4        799    6292380   83    Linux
4. Uncompress the root file system into the EXT4 partition with “sudo”
5. Plug the Micro-SD card into Odroid-A and enter in u-boot command line.
# setenv bootargs root=/dev/mmcblk0p1 rw rootfstype=ext4 init=/sbin/init console=ttySAC1,115200
# movi read kernel 40008000; bootm 40008000
# saveenv
* Please note that the latest(27-May version) u-boot can support ‘saveenv’ command.
6. After booting, I set-up internet connection with USB-ethernet to install Ubuntu-Desktop.
sudo ifconfig eth0 [your static ip_address] up
sudo route add default gw [your gateway_ip_address] dev eth0
7. Install GUI of Ubuntu. (This may take several hours !!!)
sudo apt-get update
sudo apt-get install ubuntu-desktop
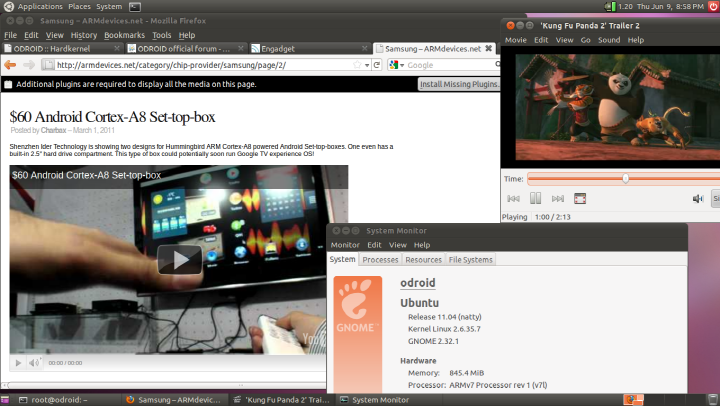
8. Reboot and enjoy. This is a screen shot of my Odroid-A.
http://dev.odroid.com/wiki/odroida/pds/FrontPage/Screenshot11.png<<== Click this to show full size image.
9. Activate WiFi connection.
$ sudo mkdir -p /system/etc/firmware
==> copy fw_bcm4329.bin, nvram files into /system/etc/firmware directory.
$ sudo mkdir /lib/modules/2.6.35.7/kernel/lib
==> copy bcm4329.ko file into /lib/modules/2.6.35.7/kernel/lib/ directory.
$ sudo vi /lib/modules/2.6.35.7/modules.dep
----------------------------------------
kernel/lib/bcm4329.ko: <--- Add this line and save.
----------------------------------------
$ sudo vi /etc/modules
----------------------------------------
bcm4329 <--- Add this line and save.
----------------------------------------
$ sudo vi /etc/network/interfaces
----------------------------------------
auto lo
iface lo inet loopback
auto eth0
iface eth0 inet dhcp
address 192.168.0.204 <--- AP IP ADDRESS(static)
gateway 192.168.0.1
dns-nameserver 192.168.0.1
netmask 255.255.255.0
wpa-driver wext
wpa-ssid hardkernel2 <--- Your SSID
wpa-ap-scan 2
wpa-proto RSN
wpa-pairwise CCMP
wpa-group CCMP
wpa-key-mgmt WPA-PSK
wpa-psk 81b2ae31a8dede0e05e446fbf6a243c71f865909c349bba1ecdca996e5e0417e <--- your WPA hex_key
----------------------------------------
How to make a WPA-PSK key.
$ wpa_passphrase <your_essid><your_ascii_key>
network={
ssid=\"test\"
#psk=\"12345678\"
psk=fe727aa8b64ac9b3f54c72432da14faed933ea511ecab1 5bbc6c52e7522f709a <--- Copy this to wpa-psk !
}
10. Status…
This is a trial build and test. There should be many known/unknown issues.
LCD, WiFi, Audio, Keyboard, Mouse, USB-ethernet and Dual-Core are working well.
Touch-screen, Bluetooth, sensors and 3G modem are not working.
Mali-400 based 2D/3D accelerated x-server driver(X11 Display Drivers) can be delivered from ARM.
Refer this link for further steps.
http://www.malideveloper.com/developer-resources/drivers/index.php